The Nintoaster is a differently modified video game console owned by the Nerd, which was given to him by Richard Daluz. Moreover, it is a chrome household toaster fitted with the body parts of a Nintendo Entertainment System, allowing it to play NES games.
Whereas, the “Nintoaster” is a portmanteau of the gaming company “Nintendo” and the word “toaster.” The console was fixed and upgraded by German YouTuber Primary, who uploaded a video on his channel in January 2021 where he documented how he contacted James, repaired the system, and also, installed the HDMI mod.
Table of Contents
History
While, the pairing of a 1950s-style toaster and a 1980s gaming console makes for a double layer of retro love. To prove the Nintoaster’s viability, Kotavuopio shared a video of the console hooked up to a screen. For this reason, he turns it on, plugs a cartridge into the bread slot, and runs Duck Tales with the matching controller.
Steps to Make Nintoaster
Step 1: Disassemble NES & Toaster. And, Cartridge Connector Fitting.
Step 2: Power Switch & Video Amp.
Step 3: Solder NES to 72-Pin Connector.
Step 4: Epoxy Cartridge Connector, Acrylic Guides and, Power Supply.
Step 5: RCA / Reset Switch & Controller Ports. LED Array works now.
Parts Needed to Make Nintoaster
- Toaster
- Complete Working NES System
- Jumper Wires
- 2n4401 transistor
- 33-ohm resistor
- 220-ohm resistor
- Random pieces of wood that would cut
- On/Off button (momentary is what I used)
- >7 V AC Adapter
- Perf Board
- Thin Solder
- Hot Glue
- Soldering Iron
- Heat Gun
- Pliers
- Twine (optional)
- Electrical Tape
- Plexiglass
- AV Ports
- Dremel Drill
- Spray Paint (optional)
- Foam Board
- NES Controllers and Games
- Extension Cord and also,
- Sheet metal
Nintoaster- A Modified 8-Bit Nintendo Entertainment System
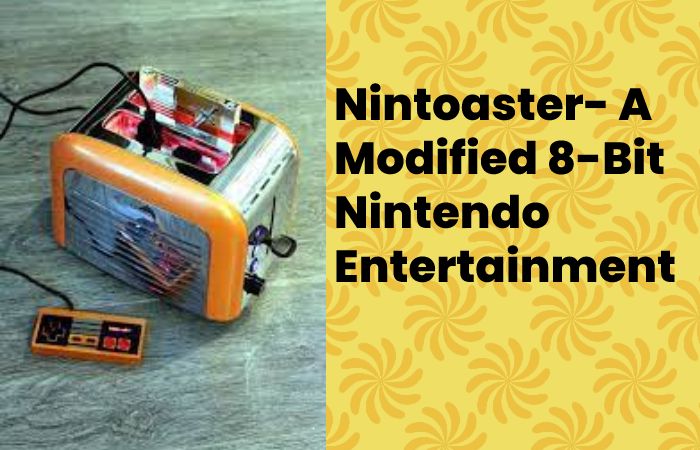
Undoubtedly, Nintoaster is a fully functioning Nintendo 8-bit NES with a power button, reset button, and LED’s with brightness controls. Further, Jarnok33 even modified the controllers with LEDs and painted them to match the Nintoaster.
The Instructional Steps of Making Nintoaster by Richard Daluz
- Flipping the Bird: Daluz does this to the narrator after putting on a makeshift anti-static wrist strap. At the same time, fit the NES motherboard into tight spaces and secure screws, fashioners, bolts, clips, and also, knobs.
- Layman’s Terms: Commenting on the original system’s cartridge connector:
- We won’t be using it because it’s poorly designed. And it sucks.
- Long List: The list of items needed to make a Nintoaster (besides the NES and toaster) includes a “short list of parts”.
- A Philips head screwdriver, a soldering iron, and also, DE soldering iron.
- Some solder wick, solder, an X-Acton knife, pliers.
- Wire strippers; a drill or similar rotary tool.
- A digital multimeter to varying lengths of test cable with also, alligator clip ends.
- A smaller screwdriver set.
- A plenty of extra glue, and also, hot glue gun.
- A lighter.
- A good set of drill bits will also come in handy.
- Electrical tape, measuring tape, a pen, and also, painter’s tape.
- Q-tips; different lengths of light wiring; and also, personal fuel.
- Running Gag: Whenever a part is recommended to be kept for safekeeping, it ends up in the trash instead.
Conclusion
However, the most appealing aspect of the mod is the functionality of the toaster lever, which powers the system on and off and engages the LED illumination. Hence, disappointingly, the temperature knob on the toaster is the only feature of the design which does not have a function attached to it. Nevertheless, the furnishing options are endless—the Nintoaster could work equally well in both a kitchen and a living room.

What is High-speed Internet?
High-Speed Internet High-velocity Internet, also referred to as broadband Internet, is defined via the Federal Communications Commission (FCC) as Internet…

What is Bitcoins-Era?
Bitcoins-Era is a trading podium that uses a sophisticated artificial intelligence system capable of analyzing the market and autonomously buying…